Sunday 30 December 2012

A POST FROM SEAN!?!? UNBELIEVABLE!

Hello to my eleven followers! 
As you see below, I haven't posted any new stuff in approx 5 million years. 
SO...

I'm gonna post some things!
Where we left off, I'd just sculpted my hands and everything was going well, 
WELL THAT DIDN'T LAST LONG!

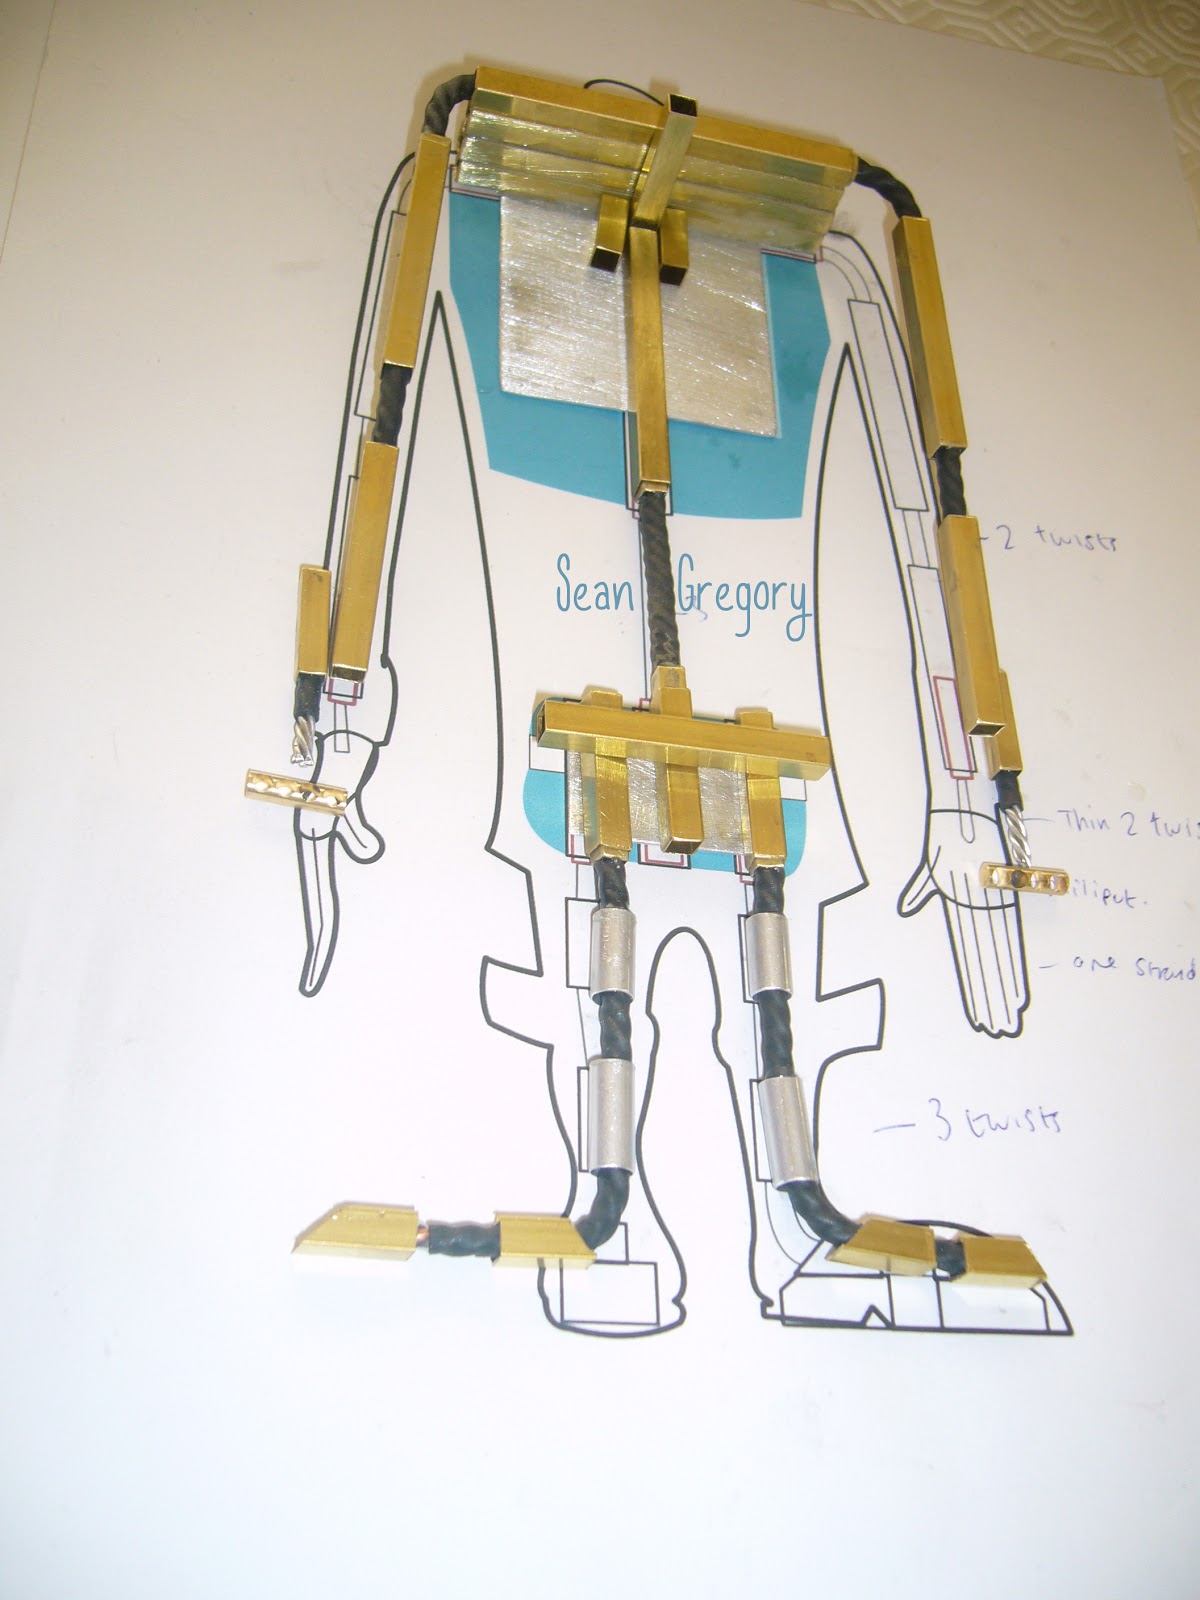
I'm presenting my work in a slightly different format in these next couple of posts as this is how they were handed into uni. 

So then, On to the shoesies for my old guy!

Open up the pictures for a description of the process!


After the boots were done and dusted...
I went on to the head... Here's how I tried and (as you'll find out later) failed.


After I sculpted the shape I wanted out of the hard blue foam for my guy's head, I made a little block of wood with a posable wire attached so I could lay 'Super Sculpey Firm' clay on top of the head and avoid constant handling.  


Then, I made a little block of sculpey for the eyes to go into.
I bought some beads from the very manly shop Claire's Accessories, and then pressed them into a soft piece of sculpey, so there was a nice dip for them to move around in.
I then baked the clay.
To the left is the eye block inserted into the head.


After a couple hours of sculpting I got this unfinished head above...


To the left: The finished back of the head.


Right: Finished front with no eyes. and no mouth/forehead (being done in plasterscene and replaceable)

Yet another disaster!

Once the finished head was ready for baking, I put it in the oven, and within about 3 minutes this happened!

The foam underneath had sort of melted/expanded and then cracked the sculpey on top 
This was obviously horrible If you're working toward a deadline, so I just started again, from scratch, used a more heat resistant foam (that i'd used in first year) and cooked it on a lower heat,

Pictures of the final head will appear shortly :)   


Mistakes are good!

Friday 2 November 2012

Need a Hand?


For my old man character I'm sculpting some long, creepy, wrinkly and tired looking hands.
When I heard my sound clip, in my head I instantly saw these very expressive long fingers making really nice poses and gestures, so that's what I'm going to try and re-create.  :D

Here's what I got so far...  

First I made a simple wire armature for a hand using the thin aluminium wire seen above,
 I then sculpt around it, making a simple hand shape in 'Super Sculpey Firm' 

 One Finger done! 


IF YA LIKE IT THEN YA SHOULD HAVE PUT A RING ON IT
 All the fingers and thumb done, needs a bit more work on the knuckles but I'm happy with it at the moment :)


 Dodgey Pictures of front and back of my hand sculpt


To make this hand, I mainly used a rounded file and a little Poundland knife.

Saving money on sculpting tools since 1993


Feet and Head in progress...

More Riggedy Rigging Points!


Hello There!
  After a talk with Martin, one of the tutors at uni, We came to the conclusion of 'THE ARMATURE NEEDS A BETTER RIGGING POINT'

So here are some little piccys of what I've done, this wasn't part of the armature plan, but what the hey, Its all learning for next time!


 Padding out the armature's chest piece
with harm foam,

Here I have carved out the inside of the foam so my armature fits inside all warm and snuggly 
Armature covered in foam! 
BACK TO THE FEET
To make things a bit more sturdy on the feet I applied a layer of
Miliput over the K&S and metallic foot block
Tah Daaaah!
(More or less Final) Armature with hard foam added


Now on to the sculpting of the hands, boots and the head!

Stay Tuned.

Sunday 28 October 2012

Thanky You Malvern Armatures.


Yesterday I received some magnetic feet for my armature from this lovely site, 

I bought four of these lovelies, and they work incredibly well for my feet! 


They sell a selection of Human, Gorilla and Dog Armatures


 Ordered on Thursday night, came on Saturday morning!


Once delivered by PARCEL FORCE, I cut the metal down to make them a little smaller and slanted on the toe,
making it easier to fit under the shoe, (Usually Malvern Armatures provide this service and more when sending these feet blocks as they are intended for ball and socket Armatures.
As my idea was a bit different, I asked to have them with nothing done to them, AWESOME SERVICE!)
 I then cut four K&S pieces to shape so that I could run the twisted aluminium wire.
I then filed and sanded down the magnetic feet blocks, glued the K&S to them and then eventually glued the wire through the two. 

Ta Dahh!


Malvern Armatures
4 Hawthorn Lane
Malvern,
WORCS WR14 3LA
Telephone: 01684 562872
Mobile: 07813 702 042
Email: sales@malvern-armatures.co.uk

Replaceable Joints?


Notches on the neck joint.

Just before gluing all the parts needed for my armature, I had to create replaceable legs, arms, wrists, neck and rigging points. 
To do this I used a smaller section of K&S, glued the wire inside at the correct length and inserted it into a larger K&S bar. I then created a little notch using the tip of a file and a hammer. This then holds the smaller K&S within the larger, and also makes a satisfying popping sound when taken apart!


                                                                       Notched hip block.
                                              See the little notches on the top?
               
Once every replaceable joint was notched, I glued everything that needed gluing.
Here it is so far without any feet
Look at dem notches!

That silver metal used for the chest piece is a sheet of Aluminium I bought.
Usually I use pennies, but my design didn't really support that, so, I used some aluminium, its lighter, larger...
but sadly.. costs more than a penny :(

Armature Designing/Making


On to the armature for my Old Man!

This week I've been designing and constructing my armature for uni. To the left is a digital armature plan I created, It was my first digital version I've ever done for any of my puppets as up until now I've just used hand drawn designs.
It was nice doing it on the computer as, with the guidelines on photoshop, I could get the front view and side view one hundred percent correct to eachother
As my scene is 14 seconds (with an extra 3 added on for something at the end) there are a lot of replaceable joints, just 
incase things break


About 12 years later... 
all the K&S, chest piece and hip piece was cut and filed, wire twisted and heat shrink wrapped.


Putting all my plans on the table!

Here, I was just getting everything ready to glue together, measuring up things to the plan,
You might realise that he has nothing for his feet to hold him down, this is because I have ordered some magnetic blocks from a lovely site named Malvern Armatures:
http://www.malvern-armatures.co.uk
and I was waiting for the post man to bring me my treats!
Gluing the parts together with a two part epoxy glue so its nice and strong!

Set of three files used to smooth out the K&S and the glue ready and waiting.


Close up of the unglued parts.