Sunday 28 October 2012

Thanky You Malvern Armatures.


Yesterday I received some magnetic feet for my armature from this lovely site, 

I bought four of these lovelies, and they work incredibly well for my feet! 


They sell a selection of Human, Gorilla and Dog Armatures


 Ordered on Thursday night, came on Saturday morning!


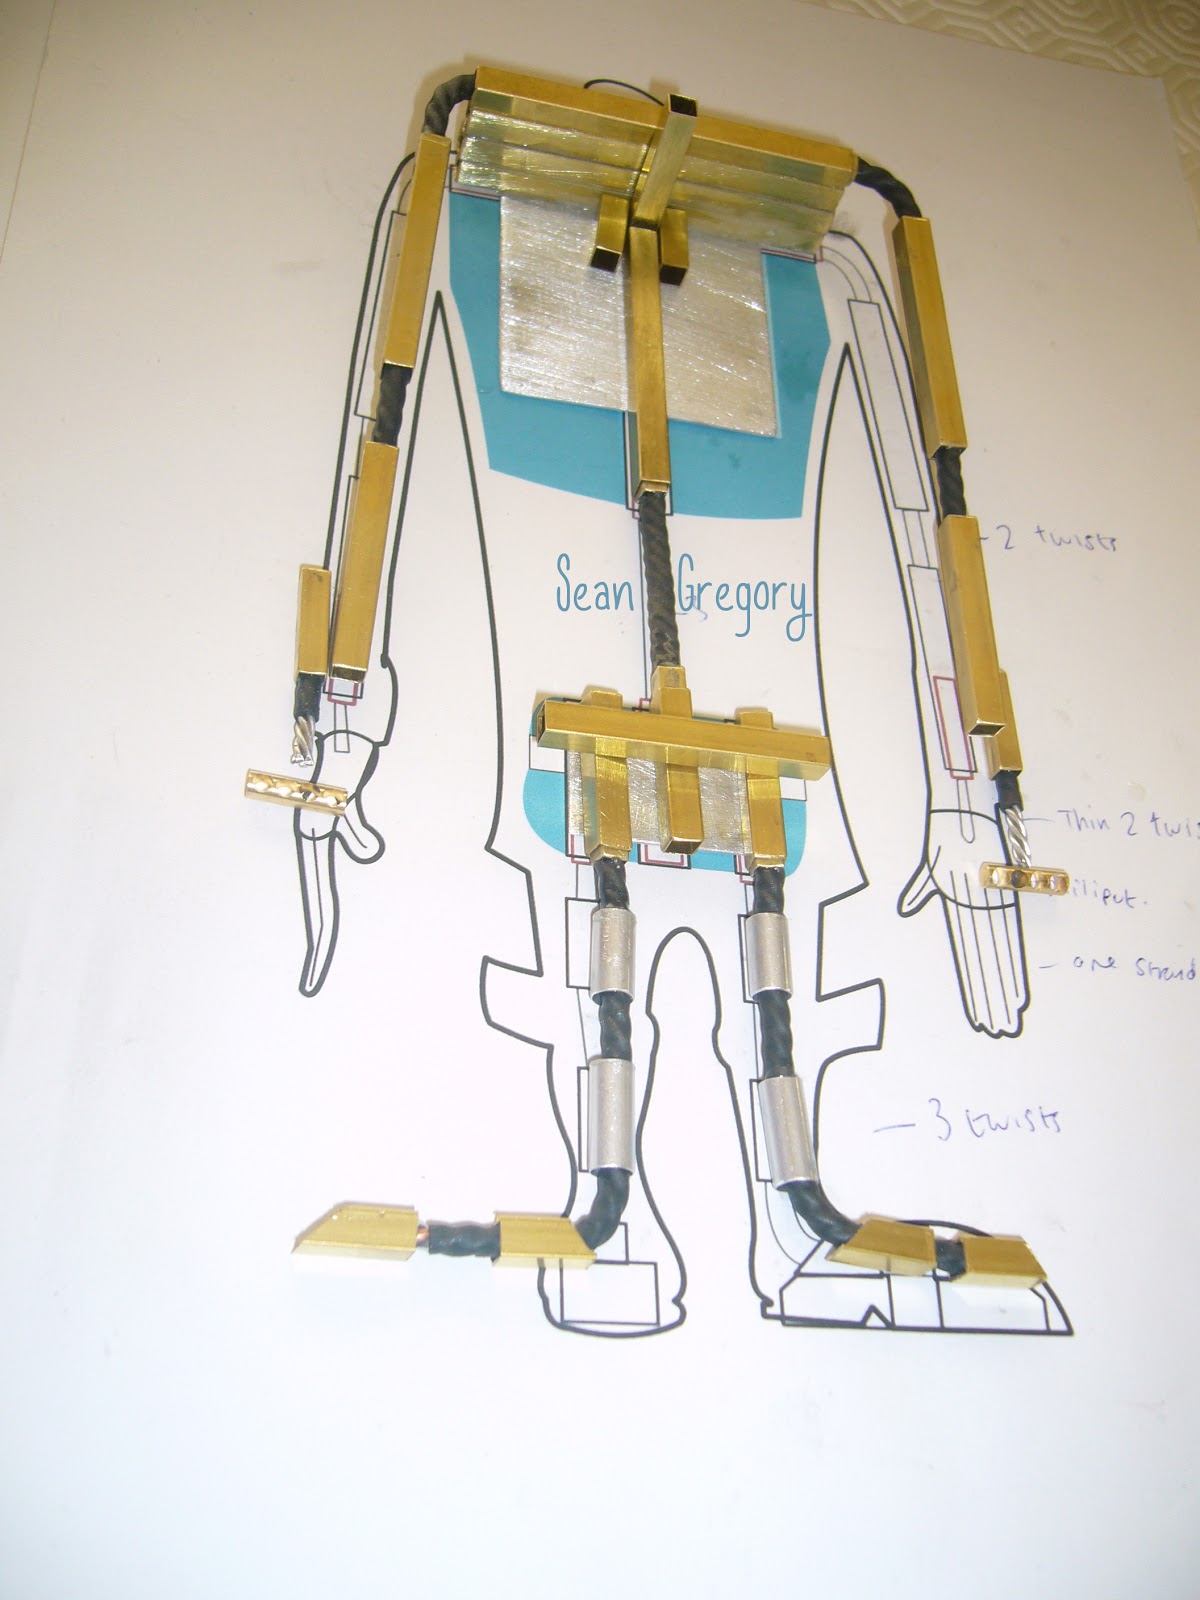
Once delivered by PARCEL FORCE, I cut the metal down to make them a little smaller and slanted on the toe,
making it easier to fit under the shoe, (Usually Malvern Armatures provide this service and more when sending these feet blocks as they are intended for ball and socket Armatures.
As my idea was a bit different, I asked to have them with nothing done to them, AWESOME SERVICE!)
 I then cut four K&S pieces to shape so that I could run the twisted aluminium wire.
I then filed and sanded down the magnetic feet blocks, glued the K&S to them and then eventually glued the wire through the two. 

Ta Dahh!


Malvern Armatures
4 Hawthorn Lane
Malvern,
WORCS WR14 3LA
Telephone: 01684 562872
Mobile: 07813 702 042
Email: sales@malvern-armatures.co.uk

Replaceable Joints?


Notches on the neck joint.

Just before gluing all the parts needed for my armature, I had to create replaceable legs, arms, wrists, neck and rigging points. 
To do this I used a smaller section of K&S, glued the wire inside at the correct length and inserted it into a larger K&S bar. I then created a little notch using the tip of a file and a hammer. This then holds the smaller K&S within the larger, and also makes a satisfying popping sound when taken apart!


                                                                       Notched hip block.
                                              See the little notches on the top?
               
Once every replaceable joint was notched, I glued everything that needed gluing.
Here it is so far without any feet
Look at dem notches!

That silver metal used for the chest piece is a sheet of Aluminium I bought.
Usually I use pennies, but my design didn't really support that, so, I used some aluminium, its lighter, larger...
but sadly.. costs more than a penny :(

Armature Designing/Making


On to the armature for my Old Man!

This week I've been designing and constructing my armature for uni. To the left is a digital armature plan I created, It was my first digital version I've ever done for any of my puppets as up until now I've just used hand drawn designs.
It was nice doing it on the computer as, with the guidelines on photoshop, I could get the front view and side view one hundred percent correct to eachother
As my scene is 14 seconds (with an extra 3 added on for something at the end) there are a lot of replaceable joints, just 
incase things break


About 12 years later... 
all the K&S, chest piece and hip piece was cut and filed, wire twisted and heat shrink wrapped.


Putting all my plans on the table!

Here, I was just getting everything ready to glue together, measuring up things to the plan,
You might realise that he has nothing for his feet to hold him down, this is because I have ordered some magnetic blocks from a lovely site named Malvern Armatures:
http://www.malvern-armatures.co.uk
and I was waiting for the post man to bring me my treats!
Gluing the parts together with a two part epoxy glue so its nice and strong!

Set of three files used to smooth out the K&S and the glue ready and waiting.


Close up of the unglued parts.

Character Project


Woo first proper post!

Righty, for the last two weeks in uni we've been designing characters for a sound clip from a past competition on 11 Second Club 

I've chosen to design an old man, I'm not going to say what the idea is, because it relies on shock value I think, so when I actually animate it, it should make you laugh :L 
HOPEFULLY 

But yeah, here are some designs of what I was thinking, I want him to be a wealthy, annoying old man, wearing horse riding clothing. He's really just full of himself, but the only thing that scares or makes him act differently is the concept of death! mwhahahaaaa


Here are some initial digital cutout ideas for my character.
They were simple to make, just got some textures from good ol' Google 
*ahem* I mean I took my own pictures...
and then I just cut them out into the shapes I wanted using the Pen Tool 


Three stages of drawing my final character:


Now to transfer it into an armature suitable for Stop mo!

New Blog:)

Hello,
This is the new blog for my work in second year and then eventually, third year:)
If you don't know who I am, read the About me section!
I'm not going to continue with my previous blog, so it has been disabled so don't go looking for it!

Basically this blog will document all my experiences with the time consuming, confusing, but EXTREMELY FUN world of Stop Motion animation.

Have a nice day now, 
(I don't even know why I'm writing this as I've only got two followers and one of them is in the room next to me. But oh well, I'll stop rambling for the future followers' sake)

I have also made a twitter thingy!
I have no idea what to do with it:


Ta ta