Before
making the scarf, I decided to create a little belt. This would then hide where
the jumper and trousers meet, and would hopefully make the design look more
interesting and detailed.
To start this, I obtained some thin brown leather from a pencil case I own(ed), Cut out a strip long enough to wrap around my puppet and thick enough to fold over on itself.
I then applied some strong UHU glue along the leather and folded it around itself, making a neat fold along the top edge of the belt.
Around the belt, I sculpted a belt buckle out of Super Sculpey Firm. I baked it for 10-15 minutes at 130 degrees, setting it so its nice and solid.
I then elevated it on a piece of plasticene, much like the buttons for the jacket, and then sprayed it gold, to get a nice, brush stroke free finish.
Above
is the final sprayed belt buckle, attached on with glue, so its firm and won’t
move around when animating. The belt is also attached to itself and to the
trousers, so that will not move when animating either.
 To
make the scarf, designed in my pre production, I firstly wanted it to have a
bit of secondary movement when animating it, so to achieve this, I laid out my
material I had found. And made the basic scarf shape by gluing and stitching
together.
I then made a basic wire armature to insert inside, and sewed it all together...
Week 6 Set & Prop Building
For my set, I have planned to create a front room for my character to be standing in, addressing his piece to camera, Within the room, I planned to make a grandfather clock, That eventually falls on him, an elegant table, photo frames on the walls, the walls themselves with a skirting board around them, wooden flooring, and props to go on the table, including bottles of medicine, pills, a book and maybe some sheets of paper and various other items just to feature in the background.
Firstly, the photo frames for the walls
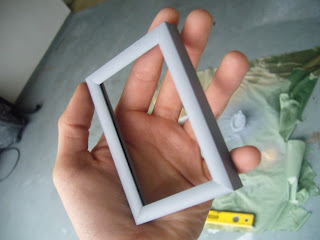
On her travels, I my Mum found this mini
photo frame in a Christmas shop, and thought that it would be a lovely addition
to my set, I decided to use this as a photo frame on the walls of the set.
However, I didn’t just use it straight away, I wanted to spray it gold so it would fit in with everything else I was planning on making, so to prepare for spraying, I cleaned any dirt or dust off, covered the glass of the frame up carefully with masking tape and elevated it on a chunk of plasterscene to avoid any pools of paint around the edge of the frame.
However, I didn’t just use it straight away, I wanted to spray it gold so it would fit in with everything else I was planning on making, so to prepare for spraying, I cleaned any dirt or dust off, covered the glass of the frame up carefully with masking tape and elevated it on a chunk of plasterscene to avoid any pools of paint around the edge of the frame.
I also found another mini photo frame in Clas Ohlson, in black, so I decided to
spray this too,
I set up an area to spray, and took a can of ‘Matt grey primer’ I then sprayed the first coat with this primer so the gold paint had a good surface to stick onto.
(The original surface was a bit slippery so paint may not have worked very well straight on top.
I set up an area to spray, and took a can of ‘Matt grey primer’ I then sprayed the first coat with this primer so the gold paint had a good surface to stick onto.
(The original surface was a bit slippery so paint may not have worked very well straight on top.

Above: final frames sprayed gold
I then went on to make some little props for the table of my set.
Firstly, I made a little book just to stick on the table for a non-moving
background prop.
My idea was to incorporate a bit of comedy into the book by entitling it
‘Outrunning death (with doctors and medicines) for Dummies.
This is because in my sound clip, whilst talking about death, he says, ‘You can
try and out-run it with doctors, medicines’ I just thought it would be quite
funny if more observant viewers saw this in the background of the set,
hopefully it will give a little chuckle.
So first of all, I made
this in photoshop by getting an image of a ‘business for dummies’ book, front
and back and sneakly, I edited parts of it to feature what I wanted. Including
the title, authors, slogans , and two pictures of ‘doctors and medicines.
I then printed this out to the correct size on a sheet of photo paper, to give
it that glossy look.
I then created a little
book out of paper, with individual pages, and then stuck the cover over it with
normal office prit stick.
Here is the final book, finished and made to look a
bit used.
I then set out to make some props, I sculpted some medicine bottles and some tiny little pills out of Super Sculpey Firm.
In my animatic, my character hits these off the table, so I have input little holed in the pills and bottles so that they can be suspended on a piece of wire and then edited out afterwards, (if there is time)
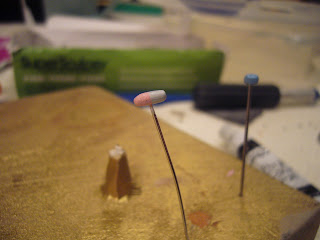
Once they were baked, I stuck them on some needles and painted the tiny little
details on in acrylic.
I now want to spray them with some clear matt finishing spray so the shininess
is toned down a tad.
To the left are all my little props painted, but
not varnished.
the bottles also need a little label on them too, that I have created in photoshop....
Above is the label
I have made on Photoshop, I still need to print it out, and stick it to the
bottles but that should take two minutes. You may notice theres a couple little jokes here that you'll never see on camera, but I had to fill up that writing somehow...
For the table of my set, I
was originally going to make it out of wood, but due to running out of time, I
have found this little jewellery box that my grandmother used to own. It’s a
brilliant size for what I wanted, and would work perfectly.
I would have loved to make it, but I just simply haven’t enough time.
Especially as I am going to make the grandfather clock.
Another thing you may notice in this picture is the wooden flooring, I bought this vinyl flooring, and for my set, it’s a perfect size, The bottoms are adhesive as well, so it will be easy to stick to a metal base for the set.
On to the Grandfather
clock. Firstly I took a wooden arts and crafts box, bought from an arts and
crafts store, took it apart and drew out a blue print (much like an armature
plan, of what pieces I would need for my clock.
Using a wood saw, I cut each section out of the piece of wood,
this picture demonstrates the amount of pieces I needed,
there was about 20 over all.
I then started to put them together, with wood glue and hot glue.
this picture demonstrates the amount of pieces I needed,
there was about 20 over all.
I then started to put them together, with wood glue and hot glue.
I first made the base, I glued all the planned
pieces together and then, along the edges, where the wood had gone lighter, due
to sanding, I took a paint brush and used a bit of Mahogany wood stain along
the edges. It worked a treat and was more or less the same colour!
I then started putting it all together....

Tah Daaahhh!!
Finished Grandfather clock, complete with animatable pendulum and face.
It can also move...
You'll find out why soon!
After this was the animating! The whole set was constructed first, (no pictures sorry :( )
and then I animated just before Christmas, had a couple of days break (for Christmas) and then got back on it in January. took ages, but its my own fault for planning a 20 second piece!
Next, you will see the final animated sequence :)


No comments:
Post a Comment